As old technology is replaced by more and more new technology, it seems that DVDs will be replaced by online streaming videos inevitably. But that day hasn’t arrived yet. In terms of quality, storage capacity and no need of internet connection, DVDs are still popular today.
Especially when you are taking a long road trip with your children and you’ve got a portable DVD player in the car, watching your favorite movies must be a beautiful thing.
Sometimes you may run into the terms of video DVD and data DVD and might be a little confused about their differences. Here we will make you clear about the two terms with simple explanations. First of all, you need to know their definitions.

A Data DVD is essentially a disk-shaped hard drive that stores files, video or other and it’s typically used on a computer. It usually has a 4.2GB capacity and is great for copying files for storage and backup. It’s not limited to video files and photos from your latest vacation, music, documents can make copies on it also.

A Video DVD is a disc that’s generally used for exhibition. You can play a video DVD in your DVD player, just like you’ve bought from the store. It has menus and chapters that you can skip around the video to fit your specific needs. You need a DVD player or a computer with a DVD drive to watch the video DVD.
The big difference between them is how you plan to use the DVD in the future. Data DVD is just like a 4GB thumb-drive more than a DVD that it can make copies for all kinds of files. The only disadvantage of data DVD is that the information can’t be erased and the disk can’t be reused later. Unlike data DVD which can contain video, image or document and any other kind of file, a video DVD can just have video files written on it.
Have you ever thought that sharing media and data over the internet is the most common means? But according to the research, burning your own DVDs is not a thing of the past yet. Many people still have the need to burn their homemade movies or slideshows into a DVD for making a birthday gift or some other usages. Stuck for ideas on how to create a DVD? Don’t worry, in this post, we will list some useful ways for making a DVD.
1. Make DVD with Free Burning Studio
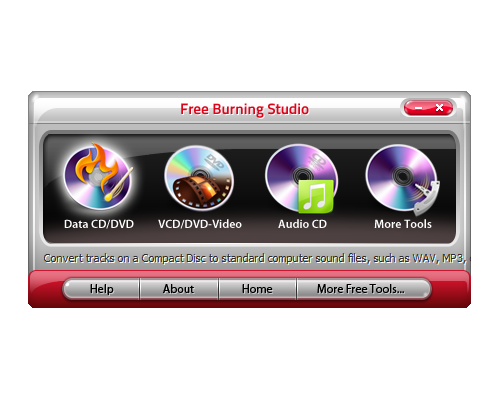
Now what you need is the right disc makers. First and foremost, there’s Free Burning Studio, a free, powerful and easy to use tool to make video DVD, data DVD, audio CD and ISO images with high quality. This comprehensive disc burning tool supports a wide range of media types like CD-R/RW, DVD+/-R, DVD+/-RW, DVD-RAM for recording. You are allowed to control the speed of the burning process. Follow the below steps and for users with or without skills, the whole process is no more than a few clicks of button.
- Step 1. Activate VCD/DVD Video Burner Once Free Burning Studio has been launched, insert a DVD into the disc drive and click “VCD/DVD-Video” to activate the video burner.
- Step 2. Select Burning Device In the list of available burning devices, choose a usable one. Click “Refresh” to update the list if new devices are added or some discs are changed.
- Step 3. Select Video Disc Type & Add Source Video In the menu of video disc type, select “DVD video”. Then, click the square button to add video files you want to burn.
- Step 4. Select Burning Mode & Speed and Start DVD Burning Select one burning mode from the menu of “Burning Mode”. Test Mode can be used to simulate burning for checking errors. Then, choose the appropriate burning speed. Click “Next” to start burning and when the process is finished, the disc will eject.
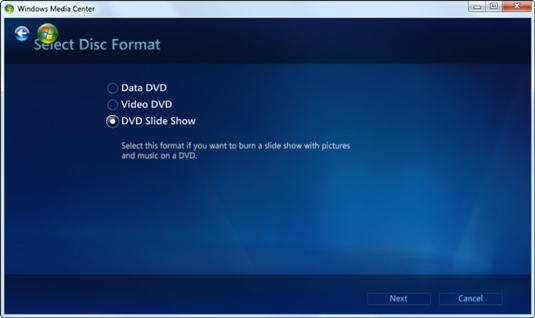
2. Burn Video DVD in Windows Media Center
Most people out there that have computers with Windows 7 OS have never tapped into the Windows Media Center component. Windows Media Center is one of the Windows 7’s features which also provides the facility to burn video DVDs with your DVD burner drive. Sometimes you might be stuck with protected WTV files and Windows Media Center will be particularly useful to help burn WTV files to a DVD.
Open Windows Media Center and go to the main menu. Now stick a blank DVD in your DVD drive and select the “Video DVD”. Type a name for the DVD and click “Next” to choose the files you want to burn. Make sure of each video clips you are going to burn and then click “Burn DVD” finally. It may take a while especially for long video.
3. Burn Data DVD Using File Explorer in Windows
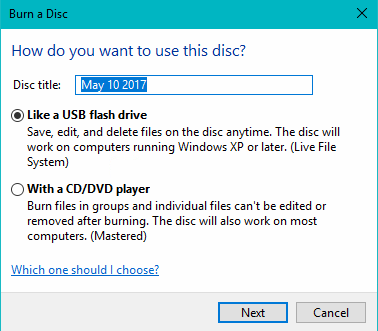
If you’re fed up with downloading, installing or paying for third-party software, there is a free option built right into your operating system. What you need to do is just insert a DVD disc into your drive and Windows will automatically popup a dialog asking what you want to do with the disc.
After pop in a DVD disc into your drive, choose the option “Burn files to disc”. In the pop-up window, choose how you want to use the disc: “Like a USB flash drive” or “With a CD/DVD player”. If you choose “With a CD/DVD player”, a new Explorer window will pop-up where you need to drag and drop files to your disc. Go to “Drive Tools – Manage – Finish burning” and in the Burn to Disc wizard, input a disc title and choose the recording speed. Click “Next” to start burning process.